inotify-tools用法
2014年12月02日 14:40
一、介绍
inotify-tools是为linux下inotify文件监控工具提供的一套C的开发接口函数库,同时还提供了一系列的命令行工具,这些工具可以用来监控文件系统的事件。Inotify-tools使用用c编写的,除了要求内核(Linux2.6.13开始)支持inotify外,不依赖于其他。inotify-tools提供两种工具,一是inotifywait,它是用来监控文件或目录的变化,二是inotifywatch,它是用来统计文件系统访问的次数。
二、初试
1.查看内核是否支持
➜  ~  grep INOTIFY_USER /boot/config-$(uname -r)
CONFIG_INOTIFY_USER=y
2.安装
➜ ~ yum install inotify-tools
3.运行inotifywait
➜  ~  inotifywait -rm workspace
Setting up watches.  Beware: since -r was given, this may take a while!
Watches established.
4. 触发事件, 查看结果
➜  ~  touch workspace/demo.py
inotifywait输出
workspace/ CREATE demo.py
workspace/ OPEN demo.py
workspace/ ATTRIB demo.py
workspace/ CLOSE_WRITE,CLOSE demo.py
三、语法
inotifywait  [-hcmrq]  [-e  <event> ] [-t <seconds> ] [--format <fmt> ]
       [--timefmt <fmt> ] <file> [ ... ]
四、选项
-r, --recursive 监视一个目录下的所有子目录。
-e , --event 指定监视的事件。
-m, --monitor 接收到一个事情而不退出,无限期地执行。默认的行为是接收到一个事情后立即退出。
-q, --quiet 指定一次,不会输出详细信息,指定二次,除了致命错误,不会输出任何信息。
-h,--help 输出帮助信息
@<file> 排除不需要监视的文件,可以是相对路径,也可以是绝对路径。
--fromfile 从文件读取需要监视的文件或排除的文件,一个文件一行,排除的文件以@开头。
-d, --daemon 跟--monitor一样,除了是在后台运行,需要指定--outfile把事情输出到一个文件。也意味着使用了--syslog。
-o, --outfile 输出事情到一个文件而不是标准输出。
-s, --syslog 输出错误信息到系统日志
--exclude 正则匹配需要排除的文件,大小写敏感。
--excludei 正则匹配需要排除的文件,忽略大小写。
-t , --timeout 设置超时时间,如果为0,则无限期地执行下去。
-c, --csv 输出csv格式。
--timefmt 指定时间格式,用于--format选项中的%T格式。
--format 指定输出格式。
%w 表示发生事件的目录
%f 表示发生事件的文件
%e 表示发生的事件
%Xe 事件以“X"分隔
%T 使用由--timefmt定义的时间格式
五、输出
watched_filename EVENT_NAMES event_filename
- watched_filename 监控文件
- EVENT_NAMES 事件名
- event_filename 事件对象文件
六、事件
access 文件读取
modify 文件更改。
attrib 文件属性更改,如权限,时间戳等。
close_write 以可写模式打开的文件被关闭,不代表此文件一定已经写入数据。
close_nowrite 以只读模式打开的文件被关闭。
close 文件被关闭,不管它是如何打开的。
open 文件打开。
moved_to 一个文件或目录移动到监听的目录,即使是在同一目录内移动,此事件也触发。
moved_from 一个文件或目录移出监听的目录,即使是在同一目录内移动,此事件也触发。
move 包括moved_to和 moved_from
move_self 文件或目录被移除,之后不再监听此文件或目录。
create 文件或目录创建
delete 文件或目录删除
delete_self 文件或目录移除,之后不再监听此文件或目录
unmount 文件系统取消挂载,之后不再监听此文件系统。
参考: https://www.centos.bz/2012/06/inotify-tools-introduction/
rsync学习
2014年12月01日 15:53
一、示例
以下面两个目录为例子
src目录结构
➜  tree src
src
└── demo.py
dest目录结构
➜  tree dest
dest
└── hello.py
1. 文件同步
➜  rsync -v src/demo.py dest
demo.py

sent 85 bytes  received 35 bytes  240.00 bytes/sec
total size is 0  speedup is 0.00
2. 目录同步
➜  rsync -av src/  dest
sending incremental file list
./
demo.py

sent 118 bytes  received 38 bytes  312.00 bytes/sec
total size is 0  speedup is 0.00
3. 远程目录同步
➜  rsync -av src/  wyq@localhost:~/dest
wyq@localhost's password:
sending incremental file list
./
demo.py

sent 118 bytes  received 38 bytes  34.67 bytes/sec
total size is 0  speedup is 0.00
二、介绍
rsync(remote sync)远程同步工具. 使用rsync算法,只传送两个文件不同的部分, 而不是每次都整份传送,因此速度相当快. 运行Rsync服务器的机器也叫备份服务,一个Rsync服务器可同时备份多个客户端的数据; 也可以多个Rsync服务器备份一个客户端的数据。
rsync服务器打开873端口, 等待对方Rsync连接。连接时,Rsync server会检查口令是否相符,若通过口令查核,则可以开始进行文件传输。第一次连通完成时,会把整份文件传输一次,下一次就只传送二个文件之间不同的部份。
rsync支持大多数linux系统,windows也有相应版本,比较知名的有cwRsync和Sync2NAS。
三、基本特点
1.可以镜像保存整个目录树和文件系统;
2.可以很容易做到保持原来文件的权限、时间、软硬链接等;
3.无须特殊权限即可安装;
4.优化的流程,文件传输效率高;
5.可以使用rcp、ssh等方式来传输文件,当然也可以通过直接的socket连接;
6.支持匿名传输。
四、语法
本地:  rsync [OPTION...] SRC... [DEST]

Access via remote shell(ssh)
  获取: rsync [OPTION...] [USER@]HOST:SRC... [DEST]
  推送: rsync [OPTION...] SRC... [USER@]HOST:DEST

Access via rsync daemon:(rsync服务器)
  Pull: rsync [OPTION...] [USER@]HOST::SRC... [DEST]
        rsync [OPTION...] rsync://[USER@]HOST[:PORT]/SRC... [DEST]
  Push: rsync [OPTION...] SRC... [USER@]HOST::DEST
        rsync [OPTION...] SRC... rsync://[USER@]HOST[:PORT]/DEST
* ":" 分隔符就启动这种模式
* "::" 分隔符启动daemon模式
* 传输方式有两种:rsync-daemon、ssh. daemon方式缺乏灵活性;ssh方式,灵活,速度快,安全性高,但是cpu消耗高.一般用ssh.
五、选项
一般都使用azv选项
-v, --verbose 详细模式
-a, archive 归档模式,表示以递归方式传输文件,并保持所有文件属性
-r, --recursive 对子目录以递归方式处理
-z, --compress 传输时对数据进行压缩
-b, --backup 创建备份,存在同名文件,将老的重新命名为~filename. 可以使用--suffix指定不同的备份文件前缀.
-l, --links 保留软链接
-L, --copy-links 像对待常规文件一样处理软链接
-e, --rsh=COMMAND 指定使用rsh, ssh方式进行数据同步
--force 强制删除目录,即使不为空
-u, --update 仅仅进行更新,也就是跳过所有已经存在于DST,并且文件时间晚于要备份的文件。(不覆盖更新的文件)
--size-only 当决定是否要备份文件时,仅仅察看文件大小而不考虑文件时间
-I, --ignore-times 不跳过那些有同样的时间和长度的文件
-t, --time 保持文件时间信息
-o, --owner 保持文件属主信息
-p, --perms 保持文件权限
-g, --group 保持文件属组信息
-q, --quiet 精简输出模式
-c, --checksum 打开校验模式,强制对文件传输进行校验
--progress 显示数据镜像同步的过程
--delete 以rsync服务器端为基础进行数据镜像同步,保持与rsync服务器目录完全一致.
--delete-excluded 同样删除接收端那些被该选项指定排除的文件
--delete-after 传输结束以后再删除
--exclude=PATTERN 排除不需要传输的文件类型
--partial 保留因故没有完全传输的文件,以加快随后的再次传输
--port=PORT 指定其它rsync服务器端口
--password-file=FILE 从FILE中得到密码
--bwlimit=KBPS 限制I/O带宽,KBytes per second
六、优点与缺点
优点
安全、备份迅速、增量备份,可以解决实时性要求不高的需求.
缺点
rsync需要扫描所有文件后进行对比,然后进行查量传输,如果文件很大,扫描文件非常耗时,而且发生变化的文件往往是很少一部分,因此比较低效.
rsync不能实时监测,两次触发动作会有时间差,导致服务器和客户端数据出现不一致。
添加dotdeb源后出现:由于没有公钥,无法验证下列签名: NO_PUBKEY E9C74FEEA2098A6E
2014年11月10日 14:55
在添加dotdeb源后,执行apt-get update出现提示
忽略 http://packages.dotdeb.org stable/all Translation-en
命中 http://mirrors.163.com wheezy-updates/main amd64 Packages/DiffIndex
命中 http://mirrors.163.com wheezy-updates/main Translation-en/DiffIndex
下载 836 B,耗时 18秒 (44 B/s)
正在读取软件包列表... 完成
W: GPG 错误:http://packages.dotdeb.org stable Release: 由于没有公钥,无法验证下列签名: NO_PUBKEY E9C74FEEA2098A6E
解决办法
执行下面两条命令
gpg --keyserver keys.gnupg.net --recv-key A2098A6E
gpg -a --export A2098A6E | apt-key add -
命令中的"A2098A6E",是错误提示"E9C74FEEA2098A6E"的后8位
apt-get包管理工具
2014年11月06日 15:51
什么是apt-get
apt(the Advanced Packaging Tool)是debian,ubuntu发行版的包管理工具,与红帽中的yum工具非常类似。
基本用法
* 搜索包 apt-cache search
* 获取包信息 apt-cache show
* 安装 apt-get install packagename
* 卸载 apt-get remove packagename
* 更新源 apt-get update
* 更新已安装的包 apt-get upgrade
* 升级系统 apt-get dist-upgrade
* 下载包的源代码 apt-get source packagename
镜像源
apt-get通过镜像源获得软件包
镜像源配置文件:/etc/apt/sources.list
网易镜像源
搜狐镜像源
阿里镜像源
sources.list有多个版本,不要下错版本
etch -- debian 4.x
lenny -- debian 5.x
squeeze -- debian 6.x
wheezy -- debian 7.x
debian版本
版本 代号    发布日期
1.1  Buzz   1996年6月17日
1.2  Rex    1996年12月12日
1.3  Bo     1997年6月2日
2.0  Hamm   1998年7月24日
2.1  Slink  1999年3月9日
2.2  Potato 2000年8月15日
3.0  Woody  2002年7月19日
3.1  Sarge  2005年6月6日
4.0  Etch   2007年4月8日
5.0  Lenny  2009年2月14日
6.0  Squeeze 2011年2月6日
7.0  Wheezy 2013年5月5日
8.0  Jessie 尚无确切时间表
判断端口通不通的几种方法
2014年8月22日 21:05
通常使用"telnet ip port"判断端口通不通. 有其它方法吗?先看下面的几种方法
准备环境
启动一个web服务器,提供端口.
[wyq@localhost ~]$ python -m SimpleHTTPServer 8080
Serving HTTP on 0.0.0.0 port 8080 ...
用其它web服务器提供端口也一样,由于python比较方便,这里就用它
使用telnet判断
telnet是windows标准服务,可以直接用;如果是linux机器,需要安装telnet.
用法: telnet ip port
先用telnet连接不存在的端口
[wyq@localhost ~]$ telnet localhost 9000
Trying 127.0.0.1...
telnet: connect to address 127.0.0.1: Connection refused
直接提示连接被拒绝
再连接上面提供的端口
[wyq@localhost ~]$ telnet localhost 8080
Trying 127.0.0.1...
Connected to localhost.
Escape character is '^]'.
看到"Connected to localhost." 可以知道连接成功了.
后台服务器有什么反映?
[wyq@localhost monitor]$ python -m SimpleHTTPServer 8080
Serving HTTP on 0.0.0.0 port 8080 ...
没有任何反映
此时telnet停住了,随便输入一个字符"a",然后回车
[wyq@localhost ~]$ telnet localhost 8080
Trying 127.0.0.1...
Connected to localhost.
Escape character is '^]'.
a
<head>
<title>Error response</title>
</head>
<body>
<h1>Error response</h1>
<p>Error code 400.
<p>Message: Bad request syntax ('a').
<p>Error code explanation: 400 = Bad request syntax or unsupported method.
</body>
Connection closed by foreign host.
再看服务器
[wyq@localhost monitor]$ python -m SimpleHTTPServer 8080
Serving HTTP on 0.0.0.0 port 8080 ...
127.0.0.1 - - [22/Aug/2014 07:15:16] code 400, message Bad request syntax ('a')
127.0.0.1 - - [22/Aug/2014 07:15:16] "a" 400 -
上面是linux环境下telnet连接一个web服务端口的情况.
使用ssh判断
ssh是linux的标准配置并且最常用,可以用来判断端口吗?
用法: ssh -v -p port username@ip
-v 调试模式(会打印日志).
-p 指定端口
usernmae可以随意
连接不存在端口
[wyq@localhost ~]$ ssh -v -p 9000 wyq@localhost
OpenSSH_6.4, OpenSSL 1.0.1e-fips 11 Feb 2013
debug1: Reading configuration data /home/wyq/.ssh/config
debug1: Reading configuration data /etc/ssh/ssh_config
debug1: /etc/ssh/ssh_config line 51: Applying options for *
debug1: Connecting to localhost [127.0.0.1] port 9000.
debug1: connect to address 127.0.0.1 port 9000: Connection refused
ssh: connect to host localhost port 9000: Connection refused
"Connection refused"表示端口不可用
连接存在的端口
[wyq@localhost ~]$ ssh -v -p 8080 wyq@localhost
OpenSSH_6.4, OpenSSL 1.0.1e-fips 11 Feb 2013
debug1: Reading configuration data /home/wyq/.ssh/config
debug1: Reading configuration data /etc/ssh/ssh_config
debug1: /etc/ssh/ssh_config line 51: Applying options for *
debug1: Connecting to localhost [127.0.0.1] port 8080.
debug1: Connection established.
debug1: identity file /home/wyq/.ssh/id_rsa type 1
debug1: identity file /home/wyq/.ssh/id_rsa-cert type -1
debug1: identity file /home/wyq/.ssh/id_dsa type -1
debug1: identity file /home/wyq/.ssh/id_dsa-cert type -1
debug1: identity file /home/wyq/.ssh/id_ecdsa type -1
debug1: identity file /home/wyq/.ssh/id_ecdsa-cert type -1
debug1: Enabling compatibility mode for protocol 2.0
debug1: Local version string SSH-2.0-OpenSSH_6.4
debug1: ssh_exchange_identification: <head>

debug1: ssh_exchange_identification: <title>Error response</title>

debug1: ssh_exchange_identification: </head>

debug1: ssh_exchange_identification: <body>

debug1: ssh_exchange_identification: <h1>Error response</h1>

debug1: ssh_exchange_identification: <p>Error code 400.

debug1: ssh_exchange_identification: <p>Message: Bad request syntax ('SSH-2.0-OpenSSH_6.4').

debug1: ssh_exchange_identification: <p>Error code explanation: 400 = Bad request syntax or unsupported method.

debug1: ssh_exchange_identification: </body>

ssh_exchange_identification: Connection closed by remote host
"Connection established" 表示已经连上端口
服务器输出
[wyq@localhost ~]$ python -m SimpleHTTPServer 8080
Serving HTTP on 0.0.0.0 port 8080 ...
127.0.0.1 - - [22/Aug/2014 13:32:55] code 400, message Bad request syntax ('SSH-2.0-OpenSSH_6.4')
127.0.0.1 - - [22/Aug/2014 13:32:55] "SSH-2.0-OpenSSH_6.4" 400 -
使用wget判断
wget是linux下的下载工具,需要先安装.
用法: wget ip:port
连接不存在的端口
[wyq@localhost ~]$ wget localhost:9000
--2014-08-22 13:36:42--  http://localhost:9000/
正在解析主机 localhost (localhost)... 127.0.0.1
正在连接 localhost (localhost)|127.0.0.1|:9000... 失败:拒绝连接。
连接存在的端口
[wyq@localhost ~]$ wget localhost:8080
--2014-08-22 13:37:22--  http://localhost:8080/
正在解析主机 localhost (localhost)... 127.0.0.1
正在连接 localhost (localhost)|127.0.0.1|:8080... 已连接。
已发出 HTTP 请求,正在等待回应... 200 OK
长度:2770 (2.7K) [text/html]
正在保存至: “index.html”

100%[======================================>] 2,770       --.-K/s 用时 0s

2014-08-22 13:37:22 (105 MB/s) - 已保存 “index.html” [2770/2770])
总结
提供端口服务,则使用了tcp协议,上面是以web服务器为例。如果服务器是更简单的tcp服务器,三个工具同样适用.
三个工具的共同点是:1.以tcp协议为基础;2.能访问指定端口. 遵循这两点可以找到很多工具.
在windows下使用telnet比较方便,linux下个人就比较喜欢用wget.
linux与linux之间共享目录
2014年6月19日 22:46
简述
在linux与windows之间共享目录使用smbfs. 但是在linux与linux之间共享目录要用nfs(Network File System网络文件系统). 服务端用nfs提供共享目录服务,客户端通过mount将共享目录挂载到本地.
以fedora 20设置共享目录为例
- 安装nfs
fedora 20要安装以下两个包
[wyq@localhost ~]$ rpm -qa |grep nfs
libnfsidmap-0.25-8.fc20.x86_64
nfs-utils-1.3.0-2.1.fc20.x86_64
- 配置共享目录
在/etc/exports文件中添加以下内容
/home/wyq/share 192.* (insecure,rw,sync,no_root_squash)
- 设置防火墙,允许nfs服务
输入sudo firewall-config打开防火墙配置界面,选中nfs服务
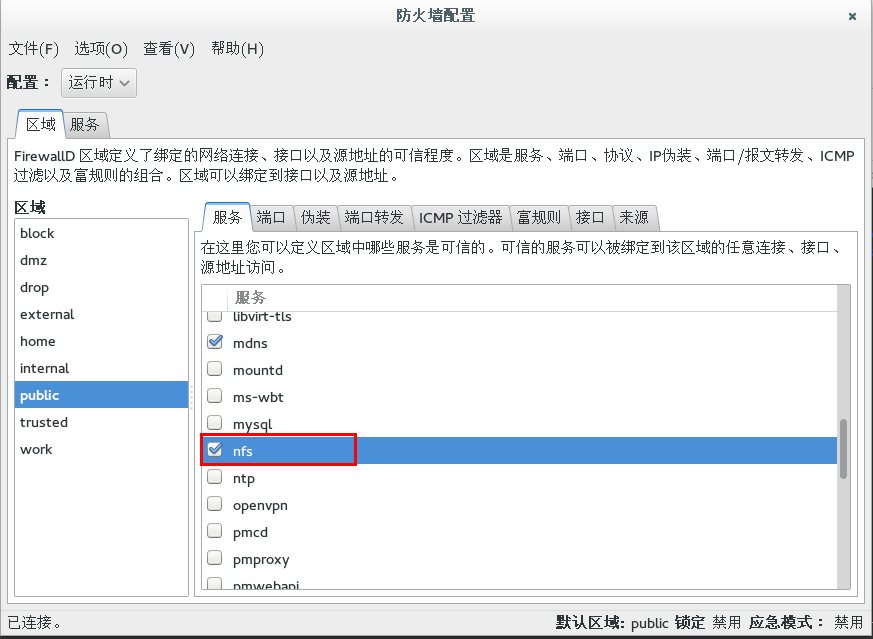
- 启动nfs服务
sudo service nfs start
- 挂载目录
sudo mount -t nfs 127.0.0.1:/home/wyq/share /home/wyq/mount
- 取消挂载
umount /home/wyq/mount
exports配置文件说明
/home/wyq/share 共享的目录
192.* 允许访问的主机IP, 如果不能确定 ,请使用 *(在fedora 20实验中表示任意IP时,不用加星号,否则nfs会无法启动)
insecure 一个安全选项, 如果nfs服务端口号小于1024则可以不添加这个选项, 否则不添加的话, 是无法访问的.其他主机访问的话就会被拒绝.
rw 共享目录的权限,rw 是可读写的权限,只读的权限是ro.
sync 同步的选项, 可选的还有 async. sync是不使用缓存,随时写入同步, async是使用缓存的.
no_root_squash NFS服务共享的目录的属性, 如果用户是root, 那么对这个目录就有root的权限.
启动nfs失败示例
- 启动nfs时提示失败
[wyq@localhost workspace]$ sudo service nfs start
Redirecting to /bin/systemctl start  nfs.service
Job for nfs-server.service failed. See 'systemctl status nfs-server.service' and 'journalctl -xn' for details.
- 根据提示查看错误信息
[wyq@localhost workspace]$ sudo systemctl status nfs-server.service
nfs-server.service - NFS Server
   Loaded: loaded (/usr/lib/systemd/system/nfs-server.service; disabled)
   Active: failed (Result: exit-code) since 四 2014-06-19 22:20:37 CST; 5s ago
  Process: 4984 ExecStopPost=/usr/sbin/exportfs -f (code=exited, status=0/SUCCESS)
  Process: 4980 ExecStop=/usr/sbin/rpc.nfsd 0 (code=exited, status=0/SUCCESS)
  Process: 3778 ExecStartPost=/usr/libexec/nfs-utils/scripts/nfs-server.postconfig (code=exited, status=0/SUCCESS)
  Process: 3761 ExecStart=/usr/sbin/rpc.nfsd $RPCNFSDARGS $RPCNFSDCOUNT (code=exited, status=0/SUCCESS)
  Process: 5371 ExecStartPre=/usr/sbin/exportfs -r (code=exited, status=1/FAILURE)
  Process: 5369 ExecStartPre=/usr/libexec/nfs-utils/scripts/nfs-server.preconfig (code=exited, status=0/SUCCESS)
 Main PID: 3761 (code=exited, status=0/SUCCESS)

6月 19 22:20:37 localhost.localdomain systemd[1]: Starting NFS Server...
6月 19 22:20:37 localhost.localdomain exportfs[5371]: exportfs: No options for /home/wyq/share *: suggest *(sync) to avoid warning
6月 19 22:20:37 localhost.localdomain exportfs[5371]: exportfs: No host name given with /home/wyq/share (insecure,rw,sync,no_root_squash), suggest *(insecure,rw,sync,no_root_squash) to avoid warning
6月 19 22:20:37 localhost.localdomain exportfs[5371]: exportfs: incompatible duplicated export entries:
6月 19 22:20:37 localhost.localdomain exportfs[5371]: exportfs:         *:/home/wyq/share (0x422) [IGNORED]
6月 19 22:20:37 localhost.localdomain exportfs[5371]: exportfs:         *:/home/wyq/share (0x425)
6月 19 22:20:37 localhost.localdomain systemd[1]: nfs-server.service: control process exited, code=exited status=1
6月 19 22:20:37 localhost.localdomain systemd[1]: Failed to start NFS Server.
6月 19 22:20:37 localhost.localdomain systemd[1]: Unit nfs-server.service entered failed state.
注意到信息中"exportfs: incompatible duplicated export entries:" 意思是有重复配置
- 查看配置文件/etc/exports, 内容如下
/home/wyq/share * (insecure,rw,sync,no_root_squash)
- 猜测是配置错误导致nfs无法启动
将配置更改为以下几种,逐一尝试
第一种
/home/wyq/share 192.* (insecure,rw,sync,no_root_squash)
第二种
/home/wyq/share (insecure,rw,sync,no_root_squash)
发现使用以上两种方式的配置,nfs均能正常启动并且被挂载.
- 结论
在fedora 20的nfs配置文件/etc/exports中,如果想让任意主机访问共享目录,不需要用*表示,不填即表示任意主机.
ssh登陆提示Too many authentication failures for wyq
2014年5月05日 16:58
碰到使用ssh登陆,直接出现认证失败次数太多的问题.
在自己机器上模拟了下面测试.
ssh登陆系统,未输入密码就提示认证失败
[wyq@localhost ~]$ ssh wyq@192.168.1.107
Received disconnect from 192.168.1.107: 2: Too many authentication failures for wyq
查看/etc/sshd/sshd_config尝试认证次数
MaxAuthTries 1
最大认证次数为1,为什么还没有输入密码就已经提示 Too many authentication failures ?
开启ssh的debug模式
[wyq@localhost ~]$ ssh -v wyq@192.168.1.107
OpenSSH_6.4, OpenSSL 1.0.1e-fips 11 Feb 2013
debug1: Reading configuration data /home/wyq/.ssh/config
debug1: Reading configuration data /etc/ssh/ssh_config
debug1: /etc/ssh/ssh_config line 51: Applying options for *
debug1: Connecting to 192.168.1.107 [192.168.1.107] port 22.
debug1: Connection established.
debug1: identity file /home/wyq/.ssh/id_rsa type 1
debug1: identity file /home/wyq/.ssh/id_rsa-cert type -1
debug1: identity file /home/wyq/.ssh/id_dsa type -1
debug1: identity file /home/wyq/.ssh/id_dsa-cert type -1
debug1: identity file /home/wyq/.ssh/id_ecdsa type -1
debug1: identity file /home/wyq/.ssh/id_ecdsa-cert type -1
debug1: Enabling compatibility mode for protocol 2.0
debug1: Local version string SSH-2.0-OpenSSH_6.4
debug1: Remote protocol version 2.0, remote software version OpenSSH_6.4
debug1: match: OpenSSH_6.4 pat OpenSSH*
debug1: SSH2_MSG_KEXINIT sent
debug1: SSH2_MSG_KEXINIT received
debug1: kex: server->client aes128-ctr hmac-md5-etm@openssh.com none
debug1: kex: client->server aes128-ctr hmac-md5-etm@openssh.com none
debug1: sending SSH2_MSG_KEX_ECDH_INIT
debug1: expecting SSH2_MSG_KEX_ECDH_REPLY
debug1: Server host key: ECDSA 66:29:e1:f3:32:92:64:da:98:bc:ab:f8:9c:a4:63:02
debug1: Host '192.168.1.107' is known and matches the ECDSA host key.
debug1: Found key in /home/wyq/.ssh/known_hosts:21
debug1: ssh_ecdsa_verify: signature correct
debug1: SSH2_MSG_NEWKEYS sent
debug1: expecting SSH2_MSG_NEWKEYS
debug1: SSH2_MSG_NEWKEYS received
debug1: Roaming not allowed by server
debug1: SSH2_MSG_SERVICE_REQUEST sent
debug1: SSH2_MSG_SERVICE_ACCEPT received
debug1: Authentications that can continue: publickey,gssapi-keyex,gssapi-with-mic,password
debug1: Next authentication method: gssapi-keyex
debug1: No valid Key exchange context
debug1: Next authentication method: gssapi-with-mic
debug1: Unspecified GSS failure.  Minor code may provide more information
Cannot determine realm for numeric host address

debug1: Unspecified GSS failure.  Minor code may provide more information
Cannot determine realm for numeric host address

debug1: Unspecified GSS failure.  Minor code may provide more information


debug1: Unspecified GSS failure.  Minor code may provide more information
Cannot determine realm for numeric host address

debug1: Next authentication method: publickey
debug1: Offering RSA public key: /home/wyq/.ssh/id_rsa
debug1: Authentications that can continue: publickey,gssapi-keyex,gssapi-with-mic,password
debug1: Trying private key: /home/wyq/.ssh/id_dsa
debug1: Trying private key: /home/wyq/.ssh/id_ecdsa
debug1: Next authentication method: password
wyq@192.168.1.107's password:
发现在提示输入密码前它已经进行了几次验证
debug1: Next authentication method: gssapi-keyex
debug1: Next authentication method: gssapi-with-mic
debug1: Next authentication method: publickey
debug1: Next authentication method: password
原来在密码认证之前,ssh已经进行了几种认证.
应该是他们导致的,具体原因就不是很清楚.
还有一个问题就是MaxAuthTries值再大,也只能输入三次密码.
这个问题也很疑惑的.
挺奇怪的,管理人员怎么喜欢修改MaxAuthTries的值?
ssh登陆密码输入错误,被中断后,别人再ssh不行吗?
默认值很合理的,完全没有必要修改.
linux端口使用权限
2014年3月25日 09:55
在Linux系统中,监听1024以下端口需要root权限。因此,如果想监听80,需要使用sudo命令启动程序。
- 示例
[wyq@localhost ~]$ python -m SimpleHTTPServer 80
Traceback (most recent call last):
  File "/usr/lib64/python2.7/runpy.py", line 162, in _run_module_as_main
    "__main__", fname, loader, pkg_name)
  File "/usr/lib64/python2.7/runpy.py", line 72, in _run_code
    exec code in run_globals
  File "/usr/lib64/python2.7/SimpleHTTPServer.py", line 220, in <module>
    test()
  File "/usr/lib64/python2.7/SimpleHTTPServer.py", line 216, in test
    BaseHTTPServer.test(HandlerClass, ServerClass)
  File "/usr/lib64/python2.7/BaseHTTPServer.py", line 595, in test
    httpd = ServerClass(server_address, HandlerClass)
  File "/usr/lib64/python2.7/SocketServer.py", line 419, in __init__
    self.server_bind()
  File "/usr/lib64/python2.7/BaseHTTPServer.py", line 108, in server_bind
    SocketServer.TCPServer.server_bind(self)
  File "/usr/lib64/python2.7/SocketServer.py", line 430, in server_bind
    self.socket.bind(self.server_address)
  File "/usr/lib64/python2.7/socket.py", line 224, in meth
    return getattr(self._sock,name)(*args)
socket.error: [Errno 13] Permission denied
fedora中iptables与firewall的关系
2014年3月13日 16:09
fedora上有两个防火墙iptables和firewall.
它们间的关系
iptables用于过滤数据包,属于网络层防火墙.
firewall能够允许哪些服务可用,那些端口可用.... 属于更高一层的防火墙。
firewall的底层是使用iptables进行数据过滤,建立在iptables之上。
默认的iptables配置
[wyq@localhost ~]$ sudo iptables -L -n
Chain INPUT (policy ACCEPT)
target     prot opt source               destination

Chain FORWARD (policy ACCEPT)
target     prot opt source               destination

Chain OUTPUT (policy ACCEPT)
target     prot opt source               destination
firewall启动后,查看iptables的配置
可以看到,firewall修改了iptables中链路
[wyq@localhost sysconfig]$ sudo iptables -L -n
Chain INPUT (policy ACCEPT)
target     prot opt source               destination
ACCEPT     all  --  0.0.0.0/0            0.0.0.0/0            ctstate RELATED,ESTABLISHED
ACCEPT     all  --  0.0.0.0/0            0.0.0.0/0
INPUT_direct  all  --  0.0.0.0/0            0.0.0.0/0
INPUT_ZONES_SOURCE  all  --  0.0.0.0/0            0.0.0.0/0
INPUT_ZONES  all  --  0.0.0.0/0            0.0.0.0/0
ACCEPT     icmp --  0.0.0.0/0            0.0.0.0/0
REJECT     all  --  0.0.0.0/0            0.0.0.0/0            reject-with icmp-host-prohibited

Chain FORWARD (policy ACCEPT)
target     prot opt source               destination
ACCEPT     all  --  0.0.0.0/0            0.0.0.0/0            ctstate RELATED,ESTABLISHED

...........
firewall可以提供高层的防火墙。
所以fedora系统中的设置防火墙,最好使用firewall